Side Dishes
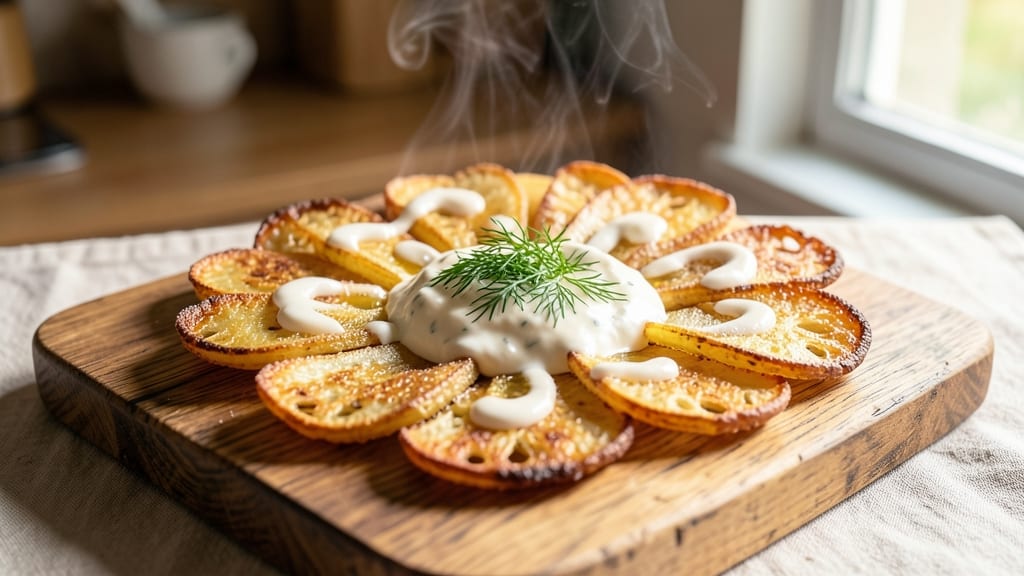
This Russian potato recipe transforms humble spuds into a dish so rich and aromatic, it feels like a hug from a Moscow winter kitchen. The secret lies in crisp golden edges that give way to fluffy, dill-infused centers—each bite carries the essence of traditional Russian comfort food.
I developed this version after years of perfecting the balance between texture and flavor, ensuring every component works together harmoniously.
The foundation begins with potatoes that are thinly sliced and fried to a golden crisp, then layered with a velvety sour cream-dill mixture that binds them into tender, cohesive layers.
What sets this dish apart is the careful ratio of sour cream to potatoes—too much makes it soggy, too little leaves it dry. The result? A dish that's restaurant-quality without requiring hours in the kitchen.
By the time you serve these potatoes, your table will smell of fresh dill and warm butter, with golden-brown layers that reveal pillowy centers. The crisp edges provide contrast to the creamy filling, creating a texture that's both satisfying and elegant.
This is the kind of side dish that elevates any meal—whether it's a holiday feast or a simple family dinner.
Serve warm with a dollop of extra sour cream, fresh dill, and a sprinkle of flaky salt for that final touch of sophistication. The beauty of this recipe is its versatility—it works as a standalone dish or pairs beautifully with grilled meats, fish, or even a hearty borscht.
Let's bring a taste of Russia to your kitchen.
Ingredients for russian potato
Potatoes, butter, dill—simple ingredients that transform into restaurant-worthy Russian comfort.
| Ingredient | Amount | Notes |
|---|---|---|
| Russet Potatoes 🥔 | 3 lb | Thinly sliced, uniform thickness |
| Unsalted Butter 🧈 | ½ cup | Cold, cut into small cubes |
| Sour Cream 🥛 | 1 ½ cups | Full-fat, room temperature |
| Fresh Dill 🌿 | ½ cup | Chopped, stems removed |
| Heavy Cream 🥛 | ¼ cup | Full-fat for richness |
| Granulated Sugar 🍚 | 1 tbsp | Balances acidity |
| Salt 🧂 | 1 ½ tsp | Kosher or sea salt |
| Black Pepper 🌶️ | ½ tsp | Freshly ground |
| Garlic Cloves 🧄 | 2 cloves | Minced, for depth |
| Flaky Sea Salt 🧂 | 1 tbsp | For final garnish |
| Vegetable Oil 🫒 | ½ cup | For frying |
| Eggs 🥚 | 2 whole | Beaten, for binding |
The potatoes are everything here. Russets are the gold standard—they're starchy enough to hold shape but fluffy inside. Trader Joe's or Costco usually have the best prices for these. If you grab them a day ahead, let them sit out to dry—this helps crisp them up better. I always slice them with a mandoline for even thickness, but a sharp knife works too if you're careful. The key is to slice them 1/8-inch thick—any thicker and they won't crisp properly. For extra crispiness, I like to soak the slices in cold water for 10 minutes before frying to remove excess starch.
No fresh dill? Dried dill works at one-third the amount, but trust me, fresh makes all the difference. The butter should be cold and cubed—this helps create those golden crisp edges. Short on sour cream? Greek yogurt with a splash of lemon juice works in a pinch, but it won't be quite as rich. The heavy cream adds a luxurious touch, but if you're watching calories, you can swap it for half-and-half or whole milk. For the garlic, I always use freshly minced—jarred garlic just doesn't have the same punch. And if you're feeling fancy, a pinch of smoked paprika in the filling adds a subtle depth.
This dish reheats beautifully—just pop it in the oven at 350°F for about 10 minutes to crisp up the edges again. It keeps well in the fridge for 3-4 days, though the texture gets softer with time. For make-ahead prep, assemble the layers but don't bake them yet. Cover and refrigerate for up to 24 hours, then bake straight from the fridge. The flavors actually get better the next day as everything melds together. If you're serving a crowd, double the recipe—it's worth the extra effort.
Why You'll Love This Recipe
- One-Pan Magic: I swear by this recipe on busy nights—just slice, toss, and bake. No chopping boards left in the sink, no extra pots to wash. The potatoes soften while the butter and cream caramelize right on the sheet pan. Chef’s kiss for lazy days.
- Creamy, Herby Bliss: That first bite of tender potato with the tangy sour cream and bright dill? It’s like a hug in food form. The heavy cream adds richness without being heavy, and the dill—fresh, not dried—makes it taste like someone actually cared. (Between us, it’s my secret for making simple meals feel fancy.)
- Leftovers That Don’t Suck: Honestly, this dish improves the next day. The flavors meld into something even richer, and it reheats like a dream—just a quick zap in the microwave or a warm in the oven. I make a double batch on Sundays because it’s the only side dish I don’t dread eating for lunch.
- Budget-Friendly Luxury: Russets are cheap, butter is a splurge you’ll love, and the rest? Pantry staples. You’re getting restaurant-quality comfort for a fraction of the cost. Plus, the sour cream and dill stretch the flavor so well—it’s the kind of dish that makes you wonder why you ever ordered takeout.
Step-by-step instructions for Russian potato dish
Here's how to create this creamy, dill-packed potato masterpiece with perfectly crisp edges.
Prepare the Potatoes for Perfect Crispiness
Peel the 3 lb russet potatoes and slice them into thin, even pieces about ⅛-inch thick. I use a mandoline for uniform slices, but a sharp chef's knife works too. Soak the sliced potatoes in cold water for 10 minutes to remove excess starch—this prevents them from turning gummy when fried.
After soaking, drain thoroughly and pat completely dry with paper towels. The drier they are, the better they'll crisp up later. Arrange the slices in a single layer on a baking sheet and let them air-dry for 15 minutes while you prepare the next steps. This extra drying time makes all the difference for that golden, crispy exterior.
Fry the Potatoes Until Golden and Crisp
Heat the 0.5 cup vegetable oil in a large skillet over medium-high heat until it shimmers but doesn't smoke. Add the dried potato slices in a single layer, being careful not to overcrowd the pan. Cook for 2-3 minutes per side until they're golden brown and crispy.
You'll know they're ready when they release easily from the pan and have developed a nice crust. Transfer the fried potatoes to paper towels to drain excess oil. If you need to fry in batches, keep the cooked potatoes warm in a 200°F oven while you finish the remaining slices. This keeps them crispy while you work.
Create the Creamy Dill Sauce
In a medium saucepan, melt the 0.5 cup unsalted butter over medium heat. Add the 2 minced garlic cloves and cook for 30 seconds until fragrant. Stir in the 0.5 cup chopped fresh dill, 1.5 tsp salt, 0.5 tsp black pepper, and 1 tbsp granulated sugar, cooking for another 1 minute to toast the dill slightly and deepen its flavor.
Reduce heat to low and gradually whisk in the 1.5 cups sour cream and 0.25 cup heavy cream. Let the mixture simmer gently for 3-4 minutes until it thickens slightly but remains smooth. The sauce should coat the back of a spoon but still be pourable. If it thickens too much, add 1-2 tablespoons of milk to reach your desired consistency.
Combine Potatoes and Sauce for Ultimate Creaminess
In a large bowl, beat the 2 whole eggs until just combined. Add the fried potatoes and gently toss to coat them evenly with the eggs. This step ensures the potatoes will absorb the creamy sauce rather than just sitting on top.
Pour the warm dill sauce over the potatoes and gently fold everything together until each potato slice is fully coated. Let the mixture sit for 5 minutes to allow the flavors to meld. The potatoes will absorb some of the sauce, so don't worry if it looks a bit dry at first—it'll come together beautifully when baked.
Bake Until Bubbly and Golden
Transfer the potato mixture to a greased 9x13-inch baking dish and spread it out evenly. Sprinkle the top with 1 tbsp flaky sea salt for that final touch of flavor and texture. Bake at 375°F for 20-25 minutes until the top is golden and bubbly, and the edges are crispy.
Here's the thing—you want to see the sauce bubbling at the edges and the potatoes looking tender when you cut into them. If the top browns too quickly, tent it loosely with foil for the last 5 minutes of baking. Let the dish rest for 10 minutes before serving to allow the sauce to set slightly and make serving easier. The result should be creamy, flavorful potatoes with that perfect balance of crispy edges and tender centers.
Pro Tips For Making Russian Potato
- Parboil First: Drop peeled potatoes into boiling salted water for 5 minutes before finishing in butter—this keeps them from falling apart when you later fold in the sour cream. I learned this the hard way after watching a batch turn to mush when I skipped it.
- Use Cold Butter: Cut unsalted butter into chunks and let it sit at room temp for 10 minutes before adding to the pan—this prevents sudden temperature spikes that can scorch the potatoes. Yes, even if you're impatient like me, this makes a real difference.
- Salt the Cream: Mix a pinch of salt into the heavy cream before folding it into the potatoes—it balances the richness and cuts through the tang of the sour cream. Sounds weird, but it works every time.
- Toast the Dill: Roughly chop fresh dill and sauté it in butter for 30 seconds before mixing into the potatoes—this deepens its flavor and prevents it from turning bitter. (Your future self will thank you.)
Troubleshooting this dish
Potatoes Too Soggy?
If your potatoes end up soggy instead of crisp, it’s usually from one of two issues: overcooking or too much moisture in the sauce. First, check your baking time—20-25 minutes at 375°F is ideal, but every oven varies.
If the sauce is too thin, let it simmer longer or add 1 tbsp cornstarch mixed with cold water to thicken it before combining with the potatoes. 💫
Sauce Separating?
When the sauce separates, it’s often because the temperature changes too quickly. Always warm the sour cream and heavy cream gradually over low heat—never microwave it, as that can cause curdling.
If separation happens, whisk in 1 tbsp cold butter to re-emulsify the sauce. For extra insurance, mix 1 tsp lemon juice into the cold cream before heating to stabilize it.
Uneven Crispiness
Uneven crispiness usually means inconsistent potato thickness or oil temperature. Use a mandoline for ⅛-inch slices and fry in batches over medium-high heat—the oil should be hot enough to sizzle but not smoke.
If the edges aren’t crispy after baking, broil for 1-2 minutes at the end to restore that golden crunch. A toothpick test works here: if it slides out clean, the potatoes are ready.
Dill Flavor Fading
Fresh dill loses potency quickly, so chop it just before using. If the flavor seems weak, add ½ tsp dill extract (or 1 tsp dried dill) to the sauce for a boost. For extra depth, toast the dill in the butter for 1 extra minute—this intensifies its aroma.
Store any leftover chopped dill in an airtight container in the fridge for up to 3 days.
Oil Smoking or Burning
If your oil starts smoking, it’s too hot—lower the heat immediately. Use a deep skillet with at least 2 inches of oil to prevent overheating. For a safer option, try avocado oil (smoke point: 520°F) instead of vegetable oil.
Always fry in batches to avoid crowding the pan, which lowers the oil temperature and leads to greasy potatoes.
Resting Time Too Short?
Skipping the 10-minute rest after baking can make the sauce runny and the potatoes harder to slice. This resting period lets the starches set and the sauce thicken slightly. If you’re in a hurry, tent the dish with foil for 5 minutes to help it set faster.
Pro tip: Serve with extra sour cream on the side—it soaks up any excess moisture beautifully. 🍽️
Nutrition facts
Frequently asked questions
What makes this Russian potato dish different from regular potato casseroles?
The magic lies in the double-frying technique and dill-infused sour cream base. Unlike traditional casseroles, these potatoes get fried twice—first for crisp edges, then baked to meld with the creamy sauce. The fresh dill and garlic in the butter create that authentic Russian flavor you won't find in basic recipes.
Can I use sweet potatoes instead of russets?
Technically yes, but russets are ideal for their starchy texture and crispiness. Sweet potatoes will work if you slice them ⅛-inch thick and fry at medium heat to prevent burning. The flavor will be sweeter, so reduce the sugar in the sauce to ½ tablespoon. For best results, stick with russets for that classic Russian texture.
How do I make this dish ahead of time?
Assemble everything in the baking dish, cover tightly, and refrigerate for up to 24 hours. Bake straight from the fridge at 375°F, adding 5-10 extra minutes to compensate for the cold start. The flavors actually improve overnight as the sauce absorbs better. For serving later, reheat at 350°F for 10 minutes to restore crispiness.
Why does my sauce sometimes separate?
This happens when the sauce cools too quickly or if the cream isn't warmed gradually. Always heat the sour cream and heavy cream together over low heat—never microwave it. For extra stability, whisk in 1 teaspoon lemon juice before warming. If separation occurs, whisk in 1 tablespoon cold butter to re-emulsify.
What's the best way to serve this dish?
Serve warm with a dollop of extra sour cream, fresh dill, and a sprinkle of flaky sea salt on top. It pairs perfectly with grilled meats, smoked fish, or even as a standalone dish with a simple green salad. For a hearty meal, add a side of pickled vegetables or a slice of rye bread. The crisp edges make it great for scooping up sauces!